Microsoft Excel can be a great option for keeping track of your personal income and expenses, or even for your start-up business accounting
Excel’s flexibility for tabulation, formulation, and chart mapping allows you to build customized applications without programming knowledge, without the need for expensive and complex accounting programs that you may not need
Record, maintain and analyze your personal or business day-to-day financial transactions. Of course, you can also use ready-made Excel templates and create your own accounting program by personalizing these templates
There are also limitations to using Excel for accounting that may encourage you to use special accounting programs
For example, entering information in an Excel accounting program is usually very time consuming and with the possibility of many errors, but in professional accounting programs related to banking portals or automatic entry of transaction information from various sources, the entry of information is faster and with less error. And even most of these programs minimize the possibility of human error with the controls created by the programmers.
The good news about Excel is that Excel also has these potential control capabilities, and if you are interested in learning these things, you will be able to take advantage of these features in your Excel program.
There are also Excel programs that provide some of the professional features you need, an interesting example of which will be introduced below.
Before you start working with Excel, it should be noted that there are many types of accounting systems, including one-way and double-accounting. One-way accounting will usually meet your needs for very limited accounting, and double accounting will give you more options, most The existing templates for Excel are based on one-way accounting, which due to Excel restrictions, these programs are very limited and to enter the information, the user is required to enter the information in different fields and pages, which increases the possibility of error
Excel Accounting Program, which is available for free download below, has eliminated many of these limitations and the complexity of transaction registration, given that it is based on two-way accounting
The free Excel accounting program is included in the link below for free download.This Excel template is designed without coding and using the double accounting system
Click here to download the bookkeeping file “Moin” by Rahkareman.ir
Introducing the program
This template consists of 8 tabs as follows:

The data and panel tabs are for entering data, and the rest are for reports and graphs.
Use the data sheet which is titled “Journal Entry” to enter transactions.

The panel tab is for submitting the categories and annual budgeting

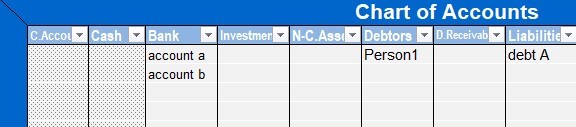
In this tab, the primary accounts are already defined as follows:
Contra account , Cash , Bank , Investments, Non-Current Assets, Debtors, Documents receivable , Liabilities, Documents payable , Wage income , Interest Income , Expense and the budget.
In this tab, Contra and Cash has no categories, so the following table is closed, but you can define sub-accounts in columns under other main accounts.
For example: Under the main heading of the Bank you can insert your bank accounts.
you can also list the titles of Financial assets, such as: stock , etc.
Non-Current Assets such as property and etc.
For the Debtors, the names of debtors.
For the Documents receivable: cheque, etc.
For Liabilities: Names of Creditors or Loans etc.
For Wage income: enter your sources of income such as: salaries and such.
In , Interest Income column: Deposits, dividends , rentals and such.
And in the Expense column: include items like transportation, clothing, health, and so on.
Atlast the Budget column to allocate the annual budget to each item of expenditure
Note: In the columns below the type titles (main accounts), only the category titles will be inserted. The balance of these accounts(categories) will be entered in the data sheet.
Note: You don’t need to insert all of the category titles , they can be added over time.
The account tab shows the Transaction of a main account or a specific category.
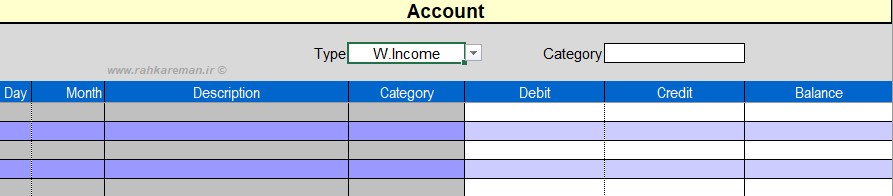
This tab is actually one of the program reports.
In the title section, select the Type of the account from the drop-down list, in which case the details of all categories will be displayed.
to view the transactions of a particular category, after selecting the desired account type , the categories list (if exists) Are displayed and selectable in the drop-down list, selecting any of these sub accounts will display the details of that account.
For example, if you only select the bank in the type field, the transactions of all the accounts that are a subset of this account type will be displayed, and for a particular account, choose the specified category from the drop-down list, ( Account A in the example above).
Charge sheet: Displays expenses by title and date. Another feature of this report is a chart showing the amount of budget usage within each cell.

Income Sheet: Displays wage and interest incomes, by title, date and type.
Summary tab: Displays the balance of all accounts.
Chart 1 and chart2 tabs: include charts of income, capital and non-capital costs and budgets, monthly revenue surplus chart, annual budgeted spending per capita, charts of income items, expenses. , Assets, Liquidity and Overall Report are Assets, Debts and Equity and so on.
Data entry
:
Before you start your daily transactions
data entry, you need to enter your accounts and balances in the following way.
First, define the categories required in the order
previously mentioned in the panel tab.
For example, insert your bank accounts below the
bank chart (figure below)
After introducing all categories, record the initial balances of these accounts in the data sheet.

Note: As you know in double entry accounting system, every transaction is recorded in two accounts. In this template , which is based on this accounting system, each transaction is recorded in at least two rows of data sheet
To enter account balances, first insert the date in the day and month fields, enter the desired description for your opening document in the description field, in the type field, select the account type from the drop-down list, or type its name . By selecting the account type, categories which you defined in the panel, appears in the drop-down list in the category table where you must select or type its name.
Note: If you make a mistake in entering the information, you will get an error message, for example in the day section, only numbers between 1 and 31 are accepted, or in the table for the month and account, you just have to Select or type the original from the drop-down list, and in the “sub-account” section you must enter a sub account name just like the panel tab, otherwise you will receive an error message as follows
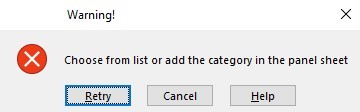
This warning means that the category title is incorrectly typed or not in the panel tab and should be defined. Then enter the balance of each account against it in the debit or credit section as follows:
The balance of cash accounts, bank accounts, Investments, Non-Current Assets, Debtors and receivable documents, are inserted in the debit area .
The balance of the Liabilities and document payable must be entered in the credit column Income and debt accounts have no outstanding balance.
In double accounting, the last balance sheet should be zero, after entering all the account balances in the DATA tab, it should bring the final balance to zero. Like the figure
As you can see in the example: After the accounts are inserted, the worksheet balance is 850, since you have a positive balance, you have to enter the same number in the negative (credit) column so that the final balance will be zero. then enter the date and description, and type or select the contra account (in short, c.account) in the account column.

Note: In most transactions, there are two distinct accounts, for example an amount transferred from the bank account to cash (bank-cash) or an income transferred to your bank account (bank-income) or cash from You are borrowing (cash- Liabilities), but in some cases, such as initial account balances (example Figure 9), there is only one specified party, in which case a contra account is used to zero or balance accounts.
Note that the worksheet balance should eventually be zero, so if you make a record in the debit column, you should record the supplement in the credit column.
Consider the following examples below:
You have spent 50 cash on purchasing utilities, you need to define the utilities title in the expense column in the panel tab before data entry:

In the above record you see that utilities title is inserted to the expense account type, and the category is titled utilities (you should define this title in panel tab).
As previously mentioned, expense accounts must be entered in the debit column, so record the amount of 50 in the debit column, as your cash assets are reduced, insert 50 in cash title and in the credit column (account Cash has no categories) and as you can see after this, the worksheet column balance is zero.
Example: On February 6, you removed 100 $ from account A and lend to person1:
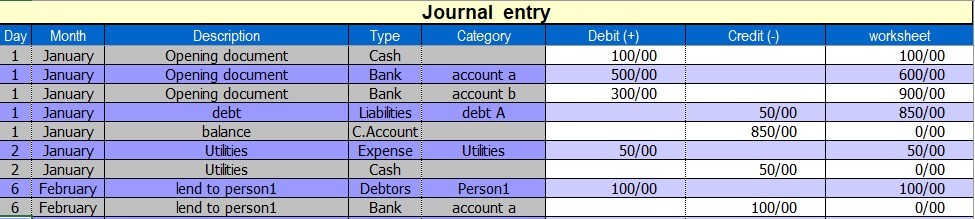
Tip: To make it easier to understand the in double entry accounting system, you can first make a record that is closer to the mind and then use the opposite entry.
In the recent example, as the sum of 50 of our bank accounts is withdrawn, it is clear that this amount is recorded on the credit column which is the asset’s deductible, so the next account-related entry must be done on the debit side.
Note: There is no difference in whether the first debtor is entered or the creditor.
If in doubt, ask your questions in the Comments section below
 (1)Dislike
 (0)
(0)
Appreciate the recommendation. Will try it out.